# 阅读图解React笔记3
Table of Contents
本文仅仅是阅读 图解 React 原理系列 的笔记,了解更多内容请查看原文链接。
React 的启动过程。
3 种启动方式
-
legacy 模式:当前 React App 使用的方式。可能不支持新功能(concurrent 支持的所有功能)
ReactDOM.render(<App />, document.getElementById('root'), (dom) => {}) -
Blocking 模式:它仅提供了 concurrent 模式的小部分功能,作为迁移到 concurrent 模式的第一个步骤。
// 创建 ReactDOMRoot 对象const reactDOMBlockingRoot = ReactDOM.createBlockingRoot(document.getElementById('id'))reactDOMBlockingRoot.render(<App />) -
Concurrent 模式:目前实验中,未来稳定之后,打算作为 React 的模式开发模式,这个模式开启所有新功能。
// 创建 ReactDOMRoot 对象const ReactDOMRoot = ReactDOMRoot.createRoot(document.getElementById('id'))ReactDOMRoot.render(<App />)
启动流程
创建全局对象
以上 3 种模式,在 React 初始化的时候,都会创建 3 个全局对象。
-
ReactDOMRoot
属于 react-dom 包,该对象暴露
render,unmount等方法,通过调用该实例的 render 方法,可以引导 react 应用的启动。 -
FiberRoot
属于 react-reconciler 包,作为 react-reconciler 在运行过程中的全局上下文,保存 fiber 构建过程中所依赖的全局状态。
大部分实例变量来存储 fiber 循环结构过程中的各种状态。react 应用内部,可以根据这些实例变量的值,控制执行逻辑。
-
HostRootFiber
属于 react-reconciler 包,这是 react 应用中的第一个 Fiber 对象,是 Fiber 树的根节点,节点的类型是 HostRoot。
这一过程是从 react-dom 包发起,内部调用了 react-reconciler 包,核心流程如下:
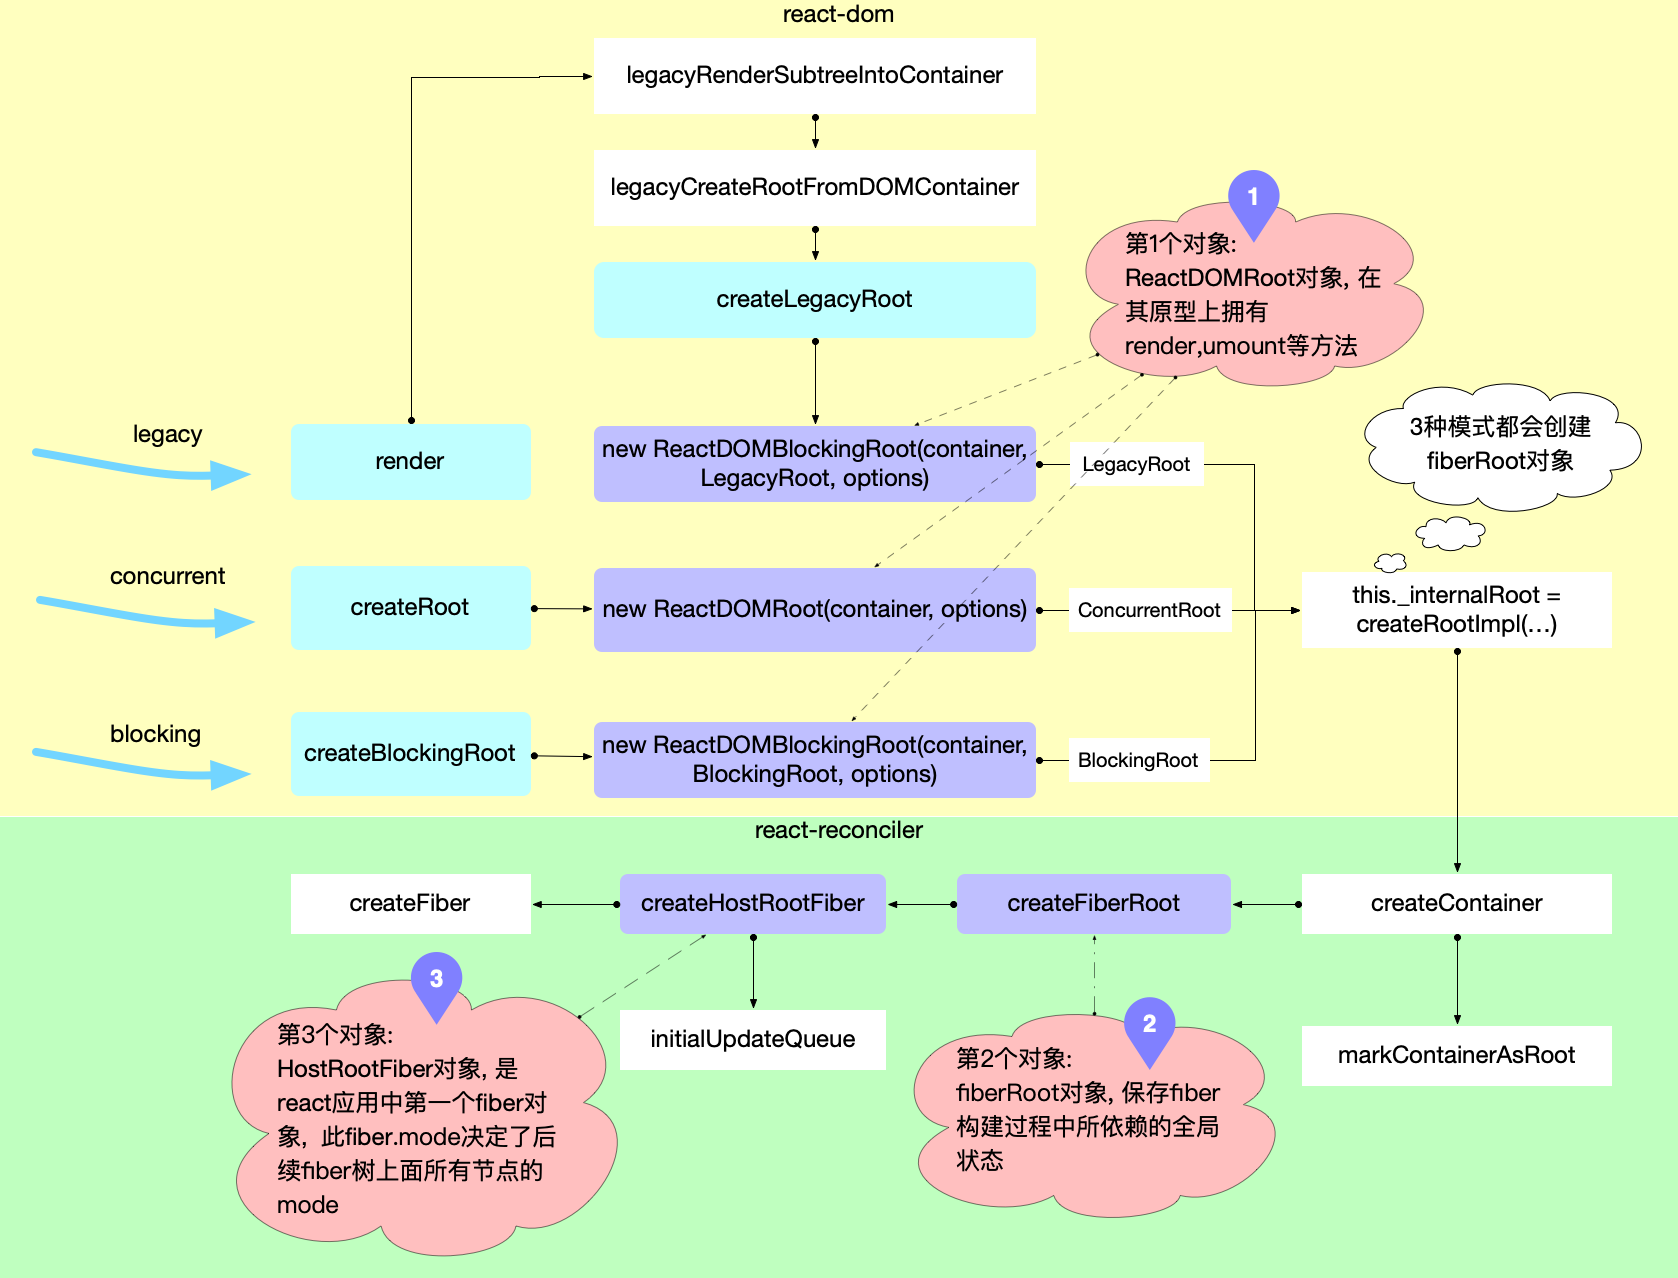
创建 ReactDOMRoot 对象
由于 3 种模式启动的 API 有所不同,所以对应了 3 种方式,最终都 new 一个 ReactDOMRoot 的实例。
对应也有 3 种 RootTag。
export type RootTag = 0 | 1 | 2;export const LegacyRoot = 0;export const BlockingRoot = 1;export const ConcurrentRoot = 2;总结
ReactDOMRoot 和 ReactDOMBlockingRoot 对象上的原型都有 render 和 unmount 的方法。
ReactDOMRoot.prototype.render = ReactDOMBlockingRoot.prototype.render = function (  children: ReactNodeList,): void {  const root = this._internalRoot;  updateContainer(children, root, null, null);};
ReactDOMRoot.prototype.unmount = ReactDOMBlockingRoot.prototype.unmount = function (): void {  updateContainer(null, root, null, () => {    unmarkContainerAsRoot(container);  });};
ReactDOMRoot 和 ReactDOMBlockingRoot 有相同的特性
- 调用 createRootImpl 创建 fiberRoot 对象,并将其挂载到 this._internalRoot 上。
- 原型上有 render 和 unmount 方法,且内部都会调用 updateContainer 进行更新。
再看看 createRootImpl
function createRootImpl(container: Container, tag: RootTag, options: void | RootOptions) {  const hydrate = options != null && options.hydrate === true;  const hydrationCallbacks = (options != null && options.hydrationOptions) || null;  const mutableSources =    (options != null &&      options.hydrationOptions != null &&      options.hydrationOptions.mutableSources) ||    null;
  // 创建 fiberRoot  const root = createContainer(container, tag, hydrate, hydrationCallbacks);  // 标记 dom 对象,把 dom 和 fiber 对象关联起来  markContainerAsRoot(root.current, container);  const containerNodeType = container.nodeType;
  if (enableEagerRootListeners) {    // 省略部分代码  } else {    // 省略部分代码  }
  if (mutableSources) {    // 省略部分代码  }
  return root;}
React 18
React 在 v18 中不再提供三种开发模式,而是以“是否使用并发特性”作为“是否开启并发更新”的依据。
具体来说,开发者在 v18 中统一使用 ReactDOM.createRoot 创建应用。
创建 FiberRoot
无论在哪种模式下,在 ReactDOMRoot 的创建过程中,都会调用 createRootImpl,在 createRootImpl 里面,通过调用 createContainer 创建 fiberRoot 对象。
export function createContainer(  containerInfo: Container,  tag: RootTag,  hydrate: boolean,  hydrationCallbacks: null | SuspenseHydrationCallbacks,): OpaqueRoot {  return createFiberRoot(containerInfo, tag, hydrate, hydrationCallbacks);}
export function createFiberRoot(  containerInfo: any,  tag: RootTag,  hydrate: boolean,  hydrationCallbacks: null | SuspenseHydrationCallbacks,): FiberRoot {  // 创建 fiberRoot 对象  const root: FiberRoot = (new FiberRootNode(containerInfo, tag, hydrate): any);
  const uninitializedFiber = createHostRootFiber(tag);  root.current = uninitializedFiber;  uninitializedFiber.stateNode = root;
  initializeUpdateQueue(uninitializedFiber);
  return root;}
在创建 HostRootFiber 时,其中 fiber.mode 属性会与 3 种 RootTag 关联起来。
创建 HostRootFiber
fiber 树中的所有节点的 mode 都会和 HostRootFiber.mode 一致。
export function createHostRootFiber(tag: RootTag): Fiber { let mode; if (tag === ConcurrentRoot) { mode = ConcurrentMode | BlockingMode | StrictMode; } else if (tag === BlockingRoot) { mode = BlockingMode | StrictMode; } else { mode = NoMode; } return createFiber(HostRoot, null, null, mode);}调用更新入口
从上面的代码可以看出,3 种模式调用更新容器都是执行了 updateContainer。而在 legacy 模式下会先调用 unbatchedUpdates,更改执行上下文为 LegacyUnbatchedContext。
export function updateContainer(  element: ReactNodeList,  container: OpaqueRoot,  parentComponent: ?React$Component<any, any>,  callback: ?Function,): Lane {  const current = container.current;  // 获取当前时间戳,计算本次更新的优先级  const eventTime = requestEventTime();  const lane = requestUpdateLane(current);
  const context = getContextForSubtree(parentComponent);  if (container.context === null) {    container.context = context;  } else {    container.pendingContext = context;  }
  const update = createUpdate(eventTime, lane);  update.payload = { element };
  callback = callback === undefined ? null : callback;  if (callback !== null) {    update.callback = callback;  }  enqueueUpdate(current, update);
  // 进入 reconciler 运作流程中的输入环节  scheduleUpdateOnFiber(current, lane, eventTime);  return lane;}
在前文 reconciler 运作流程中,分析过 scheduleUpdateOnFiber 是输入阶段的入口函数。
到此,通过调用 react-dom 的 render,react 内部经过一系列运作,完成了初始化,并且进入了 reconciler 运作的第一个阶段。
总结
本章节介绍了 react 应用的 3 种启动方式。分析了启动后创建了 3 个关键对象, 并绘制了对象在内存中的引用关系。启动过程最后调用 updateContainer 进入 react-reconciler 包,进而调用 schedulerUpdateOnFiber 函数, 与 reconciler 运作流程中的输入阶段相衔接。