# webpack 的构建流程
3 min read
Table of Contents
webpack 的主要就是根据配置,识别入口文件,然后逐级识别模块依赖,进行分析代码,转换代码,编译代码,最后输出打包后的代码。
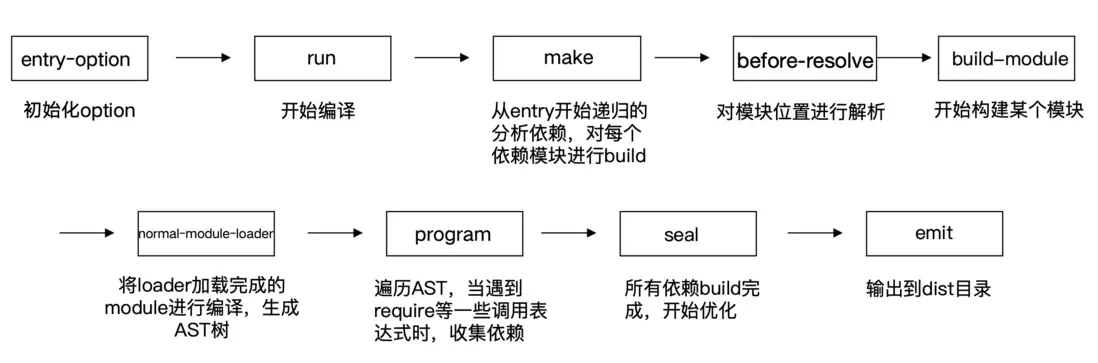
主要流程
主要流程如下:
- 运行 webpack
- 实例化 Compiler 对象
- 调用 run 开始资源的构建
开始阶段
首先是执行 lib/webpack.js 的 webpack 函数起步,在 webpack 函数中初始化 compiler 对象,初始化自定义插件。
const createCompiler = (rawOptions) => {  const compiler = new Compiler(options.context, options)  // ...  if (Array.isArray(options.plugins)) {    for (const plugin of options.plugins) {      if (typeof plugin === 'function') {        plugin.call(compiler, compiler)      } else if (plugin) {        plugin.apply(compiler)      }    }  }  // ...  return compiler}
const webpack = (options, callback) => {  // 创建 compiler 对象  const create = () => {    let compiler    let watch = false    let watchOptions    if (Array.isArray(options)) {      compiler = createMultiCompiler(options, options)      watch = options.some((options) => options.watch)      watchOptions = options.map((options) => options.watchOptions || {})    } else {      const webpackOptions = options      compiler = createCompiler(webpackOptions)      watch = webpackOptions.watch      watchOptions = webpackOptions.watchOptions || {}    }    return { compiler, watch, watchOptions }  }
  if (callback) {    try {      const { compiler, watch, watchOptions } = create()      if (watch) {        compiler.watch(watchOptions, callback)      } else {        compiler.run((err, stats) => {          compiler.close((err2) => {            callback(err || err2, stats)          })        })      }      return compiler    } catch (err) {      // ...    }  } else {    // ...  }}
webpack 进来进行创建 compiler 对象,随后调用 run 方法。
Compiler
run 函数位于 lib/Compiler.js 文件下,在 run 函数里,经历了 beforeRun -> run -> done 三个钩子。run 函数最后调用 compile 方法。
class Compiler {  run(callback) {    const onCompiled = (err, compilation) => {      if (this.hooks.shouldEmit.call(compilation) === false) {        compilation.startTime = startTime        compiler.endTime = Date.now()        const stats = new Stats(compilation)        this.hooks.done.callAsync(stats, (err) => {          // ...        })        return      }    }
    const run = () => {      this.hooks.beforeRun.callAsync(this, (err) => {        this.hooks.run.callAsync(this, (err) => {          this.readRecords((err) => {            this.compile(onCompiled)          })        })      })    }
    run()  }
  compile(callback) {    const params = this.newCompilationParams()    this.hooks.beforeCompile.callAsync(params, (err) => {      this.hooks.compile.call(params)      const compilation = this.newCompilation(params)
      this.hooks.make.callAsync(compilation, (err) => {        this.hooks.finishMake.callAsync(compilation, (err) => {          process.nextTick(() => {            compilation.finish((err) => {              compilation.seal((err) => {                this.hooks.afterCompile.callAsync(compilation, (err) => {                  return callback(null, compilation)                })              })            })          })        })      })    })  }}
通过上述操作操作之后,我们就进入创建 Compilation 对象上。
Compilation
class Compilation { finish(callback) {}}